Create and set up authorisation schedules
Written By Tess Hoogeboom
Last updated 4 months ago
Before you begin:
Make sure the user(s) have been assigned the Authorisation right.
Make sure the user(s) has/have been assigned to the relevant administration(s)
Go to Settings (cogwheel) → Authorisation Schedules and then click New.
Give the authorisation schedule a recognisable description.
Set up the workflow
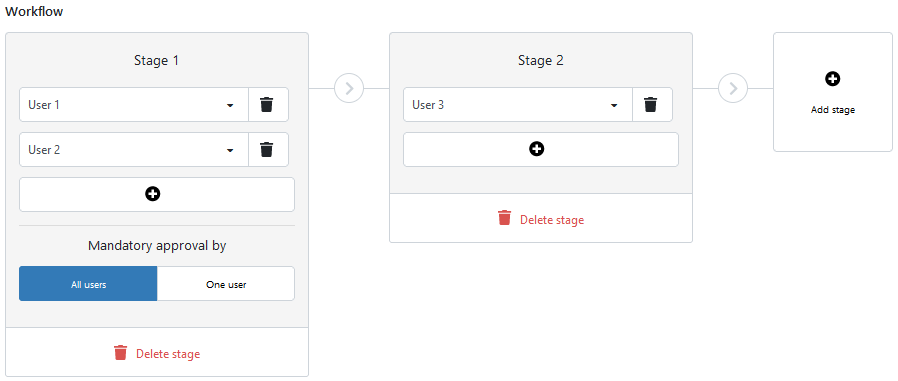
Next, you need to set up the workflow. This consists of one or more stages, each containing one or more users who will approve the documents. The document to be authorised first goes through Stage 1. Once this is complete, the document proceeds to Stage 2, and so on. A workflow can contain up to 5 Stages.
Click the button with the plus sign. Stage 1 becomes available.
Select a User in Phase 1.
If necessary, add another user using the Plus button. You can add up to 10 Users to a single stage.
If you add more than one user to a stage, an additional setting becomes available:
All users: All Users in this phase must approve the document.
One user: Only one of the users in this stage must approve the document.
Click Add stage to add a new stage. One Authorisation workflow can contain a maximum of 5 stages.
Click Delete stage to remove a stage from the workflow.
Set up administration
Finally, you assign to which administration(s) the authorisation schedule should apply to. You can link an administration to only one authorisation schedule.
Is the administration not listed under “Available Administrations”? Then the administration is already linked to another authorization scheme.
Other points to note
Once an authorisation schedule has been created, you can see which administrations have an authorisation schedule activated under Settings (cog wheel) → Administrations in the Authorisation column.
Read here How to authorize invoices via the portal and mobile app:
Read here how to set up email reminders for invoices awaiting authorization:
Frequently Asked Questions
When I go to Settings (cogwheel) → Authorisation Schedule, there’s a lock icon next to authorisation schedules. What should I do?
When I go to Settings (cogwheel) → Authorisation Schedule, there’s a lock icon next to authorisation schedules. What should I do?
If you have a Standard subscription, you cannot use authorisation. Would you like to use this feature? Then you’ll need to upgrade to a Plus subscription. Please contact our support team.
What is the difference between Authorisation and Confirmation?
What is the difference between Authorisation and Confirmation?
Authorisation takes place before the invoice is checked. During authorisation, you approve or reject the invoice after it enters the TriFact365 workflow.
Confirmation takes place after the invoice has been checked. When approving, you accept or reject the final entry proposal for this invoice. After approval, the journal entry is sent to the accounting software.
How do I authorise a document?
How do I authorise a document?
Documents can be authorised via both the portal and the mobile app. Here you can find more information: Authorizing documents
Can I receive a notification when documents are ready for me to authorise?
Can I receive a notification when documents are ready for me to authorise?
You can set up notifications in the portal at email reminders. You will then receive an email when documents are ready for you. In the mobile app, you can enable push notifications in the settings.
Was this helpful?
Still need help? Ask the team